Pay-per-View Module
This is how you install the pay-per-view module on your WordPress site.
Pay-per-view is used for selling videos which are to be played on the website.
In this post we will explain how you:
With Pay-per-View you can sell videos through the BTCPayWall.
The user sees a preview for each video, consisting of a caption, a description text and an image. In addition, the details of the video’s price are displayed.
After successful payment, the video is displayed and played on the website.
The video, which is played after successful payment, can be on your own server, but also on an external server.
For example, you can show videos that are stored on YouTube or Vimeo.
In order not to offer these videos to the general public for free, you can set the video to private. Then the video will not be shown in the search.
Only those who know the exact internet address can access this video.
If you want to offer a Vimeo or YouTube video for a fee, set it to private and store this secret Internet address as a paywall url.

General settings in the backend
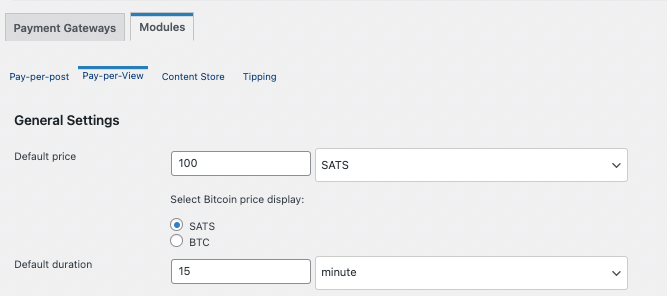
Under Modules => Pay-per-View you can make the PayWall settings for the videos.
General Settings
Here the general settings are made, which are used for all videos. Individual settings can be made for the individual videos at any time. If no individual settings are made, the general settings are used, which are set here.
Default Price
Default Price is the single price for the video, for which the viewer can unlock the video. This price can be specified in Sats or in USD or Euro.
If the price is specified in a fiat currency such as USD or EUR, then the amount is converted to Bitcoin based on the currently valid Bitcoin exchange rate and displayed to the viewer.
When selecting Select Bitcoin Price display, it can be selected whether the bitcoin price is displayed to the viewer as Sats or BTC. If Sats is selected, then the bitcoin price will be displayed as 100,000 Sats. If you choose BTC, then the price will be displayed as 0.00100000 BTC.
Default duration
Default duration defines how long the viewer gets access to the video.
Is it allowed to access the video again indefinitely after payment or only for a certain period of time.
The access permission is controlled by cookies, which are stored in the viewer’s browser.
Re-access is only possible if the same browser is used and the cookie is not deleted.
User Information
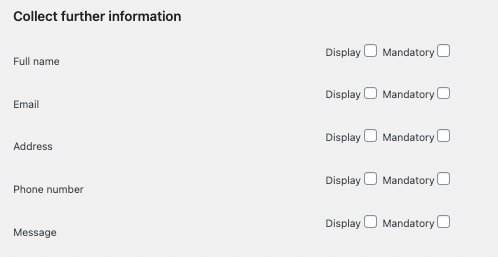
At this point you can request further information from the viewer.
When the customer clicks on pay in the paywall, he is not directly redirected to the payment page, but first to a checkout page.
On this checkout page, the fields that can be selected here are displayed.
If you select the Display option, the field will be displayed. The field does not have to be filled in by the viewer, but may remain empty.
If the checkmark is set at Mandatory, then this field is displayed and must be filled in by the viewer.
PayWall Design
The PayWall is the payment area that is displayed to the viewer before the video is played.
In the PayWall Design area, the appearance of the PayWall can be adapted to your own wishes and design.
The effects of the changes made are displayed in the preview window on the right.
Background
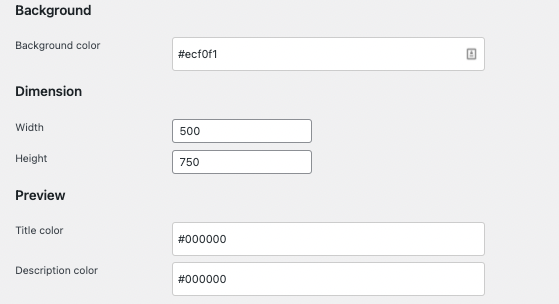
The background color of the PayWall can be set in this area. The color values are stored as HEX values.
Dimension
In this area you can set the dimensions of the PayWall in Width and Height.
Preview
In the preview area, the video can be presented with a preview image, a caption and a description. These individual descriptions per video are made at the time when the corresponding video is added to the website.
At this point the settings are made, which are identical for all videos. Title color is the color of the title for all videos. With description color the color of the description text.
Header (Description)
In this area the prompt for payment is set. In Title you can set the prompt text for the payment. With Title Color the color for this prompt text.
In Price Information, the text can be set that the customer will be shown about the price and how long they can access the item.
The four parameters:
[price]
[currency]
[duration]
[dtype]
are variables and have to be taken over in this form.
The actual values are then taken from the settings under General Settings or from the individual settings for the individual video.
The color in which the price information is displayed is set via Price information color.
Insert pay-per-view via editor
The pay-per-view feature can be inserted on any blog post or page within WordPress.
The video to be protected is enclosed with a start and end area.
BTCPayWall supports the most popular WordPress website editors, such as Gutenberg, WPBakery and Elementor.
We describe the integration of pay-per-view with Gutenberg Editor. The other editors work in a similar way.
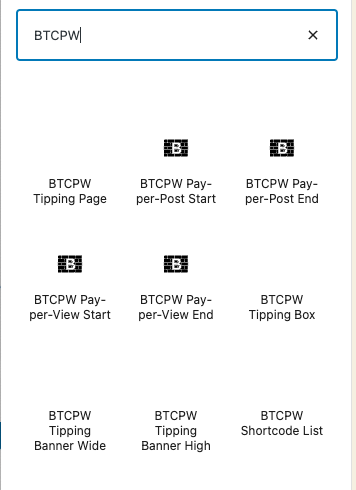
There are predefined elements available, which can be found in the element search under BTCPW (as an abbreviation for BTCPayWall).
Before the video, the element with the name BTCPW Pay-per-View Start is inserted.
After the video, the element with the name BTCPW Pay-per-View End is inserted.
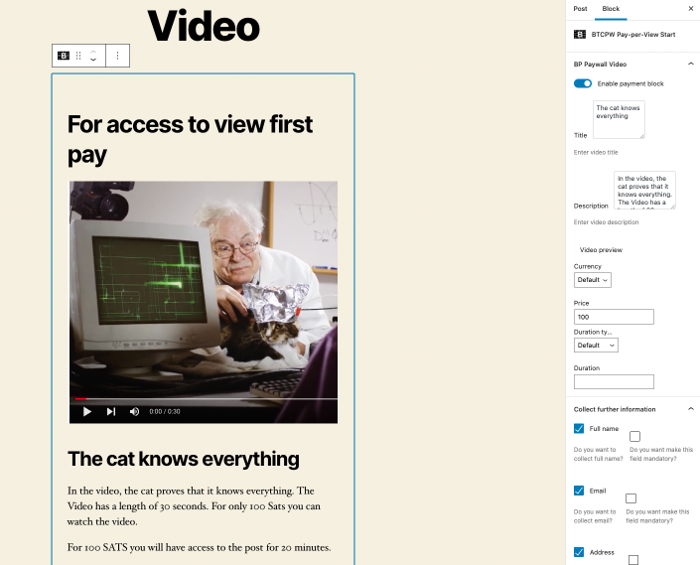
The BTCPW Pay-per-View Start settings can be changed individually. If no changes are made, the settings are taken from the General Settings.
It is important to make sure that the check mark for “Enable Payment Block” is set, because only then will the paywall for the video be displayed.
Compared to the General Settings in the backend, the settings for the individual video are made here.
In the Title area, the title for this specific video is defined.
In the Description section, the video is described and in the Preview section, a preview image of the video is stored.
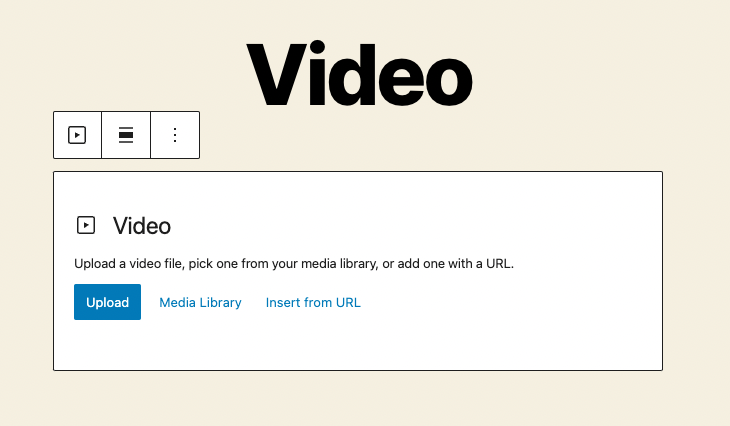
You can use the video player provided by your WordPress editor or the corresponding HTML command.
The video player specifies where the video file is stored. This can be the YouTube or Vimeo address, or the link to your own web server where the video is stored.
If the respective BTCPW pay-per-view elements have been inserted before and after the video, the video is protected by the BTCPayWall.
Insert pay-per-view via shortcode
If you don’t edit your website with a special website editor for WordPress, you can also insert the start and end command via shortcode into your website.
If you want to protect a video with a paywall, the start of the paywall area is activated with the command: btcpw_start_video pay_view_block=”true”.
Within the start command further fields can be defined, which will be shown to the user as a preview.
The following commands are available for this purpose:
– title – a headline as text
– description – a video description as text
– preview – a preview image.
For Title and Description a text can be written. For the preview image you have to provide the link where the image is stored.
Then the Internet address where the video is stored and from where it should be played is specified.
Finally you close the paywall area with the command btcpw_end_video.
Default values (from the General Settings) for the attributes (pay-per-view):
The stored default values for pay-per-view are:
- pay_view_block = false
- title = ‘Untitled’, no value is displayed
- description = ‘No description’, no value is displayed
- preview = default image as placeholder is shown
- price = the amount specified in the general settings
- currency = the currency, which was defined in the general settings
- duration = the period of time defined in the General Settings
- duration_type = the type of the period, which was defined in the General Settings
Every attribute is optional. Omitted attributes will use default values. Attribute
which controls paywall is pay_block.
In order to protect your content with paywall you need to set pay_block to true. Currency and duration_type are getting
validated.
This means that you don’t need to worry if you have set the proper value.
When you enter unsupported currency or duration_type, the default values for these fields won’t be overridden.
To use the attributes, the values must be enclosed in straight quotes, single quotes or double quotes. Using curly or smart quotes will result in an error.
At the end of the video, the protected area is closed with the btcpw_end_video command.




Leave a Reply
Your email is safe with us.